Continuing with the theme from our last post, we’ll continue to learn about Kubernetes, not by worrying about the moving parts that are required to make a cluster, but instead by using a managed service provided by Google Cloud Platform (GCP) called Google Kubernetes Engine (GKE).
As with the main cloud providers (Azure, AWS and GCP), resources can be created through a web-based control panel (also referred to as the Console or Portal) or through the command line tool i.e. aws, az or gcloud. We’ll use the command line in our examples to avoid any screenshots becoming out of date. At the time of writing we were using version 260.0.0 of the Google Cloud SDK.
The remainder of this blog post will involve practical hands-on experience.
Installing the Cloud SDK
The Cloud SDK provides a suite of command line tools that allow you to interact with services and resources on GCP. To install on a Mac with homebrew use: brew cask install google-cloud-sdk. If you’re not using a Mac, the quickstarts page can help you set up the SDK for your own computers.
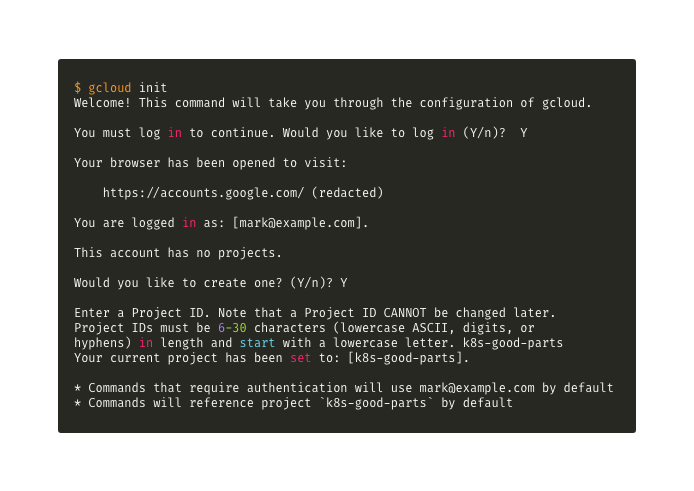
If you haven’t previously, now’s a good time to log into GCP via the command line using your Google Account.
The console output has been edited for brevity
Configuring GCP and our project
Before we can create our cluster we need to do the following:
- Link our project to a billing account
- Set our default region and zone to provision our cluster
- Enable the compute service for our project
Linking the project to billing
To set up billing, we’re going to make use of gcloud CLI’s “beta” channel for commands to allow us to link our billing account with the project. There’s also an “alpha” channel and these are exactly what they sound like these are trial commands/features going through alpha and beta stages of a software release cycle.
If commands are already in beta, there’s a good chance they’ll make it into general available (GA) which are the commands that come with the Google Cloud SDK by default.
Additional features or channels are components, so to install the beta channel we’d type the following: gcloud components install beta
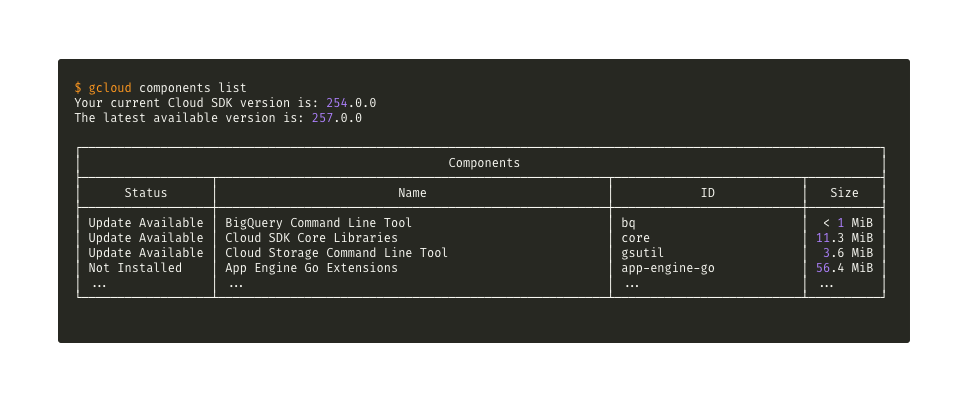
Incidentally, if you want to see what components you have installed you can see them by using the list subcommand:
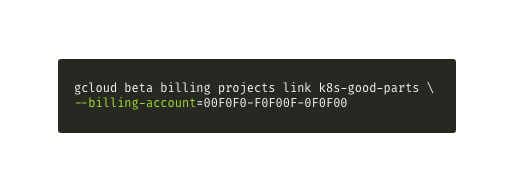
We need two bits of information to enable billing for our project; the project ID which is k8s-good-parts (from our previous posts) and the billing account ID which you can get by running: gcloud beta billing accounts list
Assuming our billing account Id is 00F0F0-F0F00F-0F0F00 we can now link our project with our billing account to our project:
Tip: if you find the command line tough or you are a bit rusty, you may find using the interactive shell helpful. This provides a friendly interface with a list of auto-complete suggestions for all of the gcloud commands. You can enable it using: gcloud beta interactive
Setting default region and zones
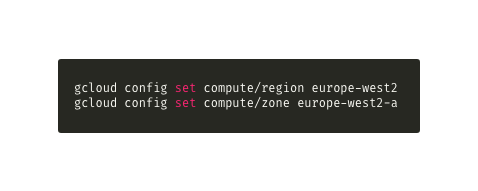
Find the region nearest to you using the Regions and zones page on Google Cloud.
Made Tech are based in the UK, so our closest region is “europe-west-2” and available zones are “a”, “b”, “c”. We’ll use zone a (“europe-west-2-a”)
Enabling GKE in the project
GKE is part of the “Kubernetes Engine API” service, so to set up the project we need to enable this service using: gcloud service enable containers.googleapis.com
Incidentally, this will activate additional services that GKE is also dependant on like Compute Engine API, Container Registry API, IAM API etc.
There may be a brief delay whilst the operation is being carried out.
Tip: To see a list of services you can enable type: gcloud service list –available
Creating our cluster
After a lot of preparation and set-up, we finally get to the moment you’ve been waiting for to create our cluster.
Let’s give it the imaginative name of “hello-k8s”: gcloud container clusters create hello-k8s
There will be another brief delay as our cluster is provisioned.
Setup Kubernetes Client
In order to communicate with our new cluster, you’ll need a client. This is kubectl (pronounced “cube control”): gcloud components install kubectl
If you’ve already got an up to date version of kubectl you can safely skip this step.
If you’ve already played around with Kubernetes i.e. using Minikube or Docker, the chances are you will have a lot of contexts (connections to different clusters). To ensure we’re connecting to our new cluster let’s check our current list of context which is available through the config command of kubectl.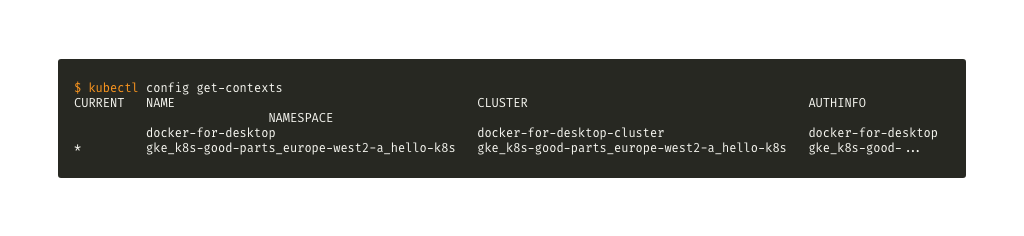
We can see that we’re still connected to the Kubernetes cluster that you can enable with Docker.
We’ll use the use-context subcommand to connect to our cluster by its name:
kubectl config use-context gke_k8s-good-parts_europe-west2-a_hello-k8s
If you run the get-context subcommand again you should see our new cluster is set as the current context.
We’ve got two more commands we’re going to run to complete our “smoke test”
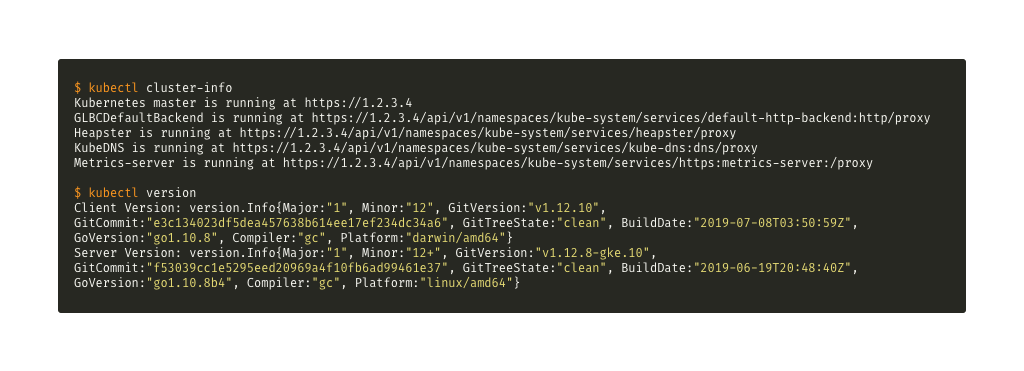 The cluster-info command allows us to check the URLs and statuses of master and cluster services.
The version command allows us to compare client (kubectl) and our server (our Kubernetes clusters) versions.
Introducing Helm, the package manager for Kubernetes
CLI tool setup
To install Helm, we’ve got a handy homebrew package: brew install kubernetes-helm
If you’re not using a Mac, the maintainers of Helm have provided instructions for installing on different platforms.
Service setup
In the early days of Kubernetes, security was pretty much a case of having the right certificates to access the cluster and default access was as root (admin).
Nowadays access is more granular and starts off with the least amount of privileges. Role Based Access Control (RBAC) is enabled by default in our new Kubernetes cluster if provisioning it on GCP. There’s a good likelihood that by the time this is published the other cloud vendors will have adopted this too.
Given the nature of what Helm can do i.e. provision various resources and setup network routing, it will need a service account.
Let’s create a new service account, to do this we’ll need to to create YAML manifest (if you’ve never used Kubernetes, everything is expressed in YAML). We’ll call it rbac-config.yaml.
Now we can run the manifest use the create command in kubectl:
kubectl create -f rbac-config.yaml
Kubernetes will confirm the creation of the service account and tiller (explain) has permissions to use the service account.
We can install the cluster service element of Helm (Tiller) and limit command history by running
helm init
Let’s update the copy of package repository that’s stored in our cluster, by default, this means we’ll use the “stable” collection of Charts (packages in Helm parlance).
helm repo update
Let’s pick a Chart (packages in Helm parlance) that’s well known and install WordPress (here’s a link to Chart page):
helm install stable/wordpress
You’ll see a lot of information on the screen, include any setup instructions that require manual intervention.
Let’s confirm our package has been installed by issuing the ls command:
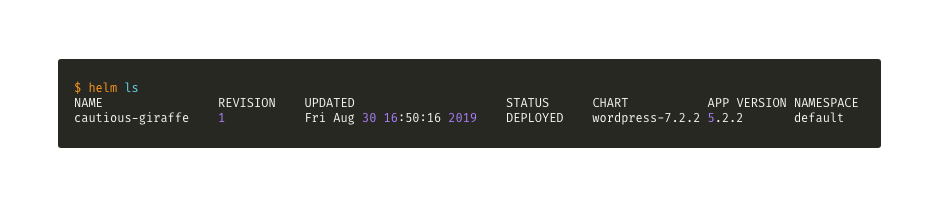
We should see just the one package installed with it’s an autogenerated name (this can be overridden), chart version use and the status.
Tip: if you forget to make a note of the instructions that you saw during the installation of WordPress you can view them again by typing helm status <name of the deployed application> i.e. helm status cautious-giraffe.
We’re going to monitor the deployment until we get an external IP address using get service (get svc) and the watch switch (-w).
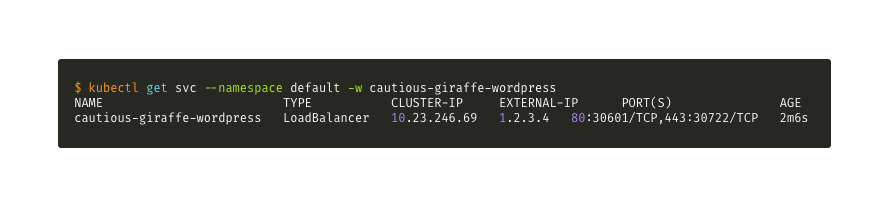
Once we’ve got an external IP address we can connect to our WordPress blog, to exit this command hit CTRL-C
Entering the IP address in a browser will display the familiar WordPress starter blog.
Teardown
That’s our first foray into using GKE on GCP, we can tear down the whole cluster by performing
gcloud container clusters delete hello-k8s
Tip: if you wanted to keep the cluster, but just delete WordPress you just need to run
helm rm <application name> i.e. helm rm cautious-giraffe.
Summary
To recap here’s some of the commands we used to interact with our cluster.
kubectl (cube control)
This is the Kubernetes client CLI tool, it’s also your primary means of running commands to manipulate the cluster. Here’s a reminder of the commands we used:
- config – switch between different clusters
- create – a service account to allow Tiller (service component of Helm) to have administrative access to the cluster
- get – the details around the application deployment of WordPress
We also used the following commands to perform a smoke test against the cluster to verify it’s status:
- cluster-info – displays the status of components installed on the master node
- version – displays the client and server (cluster) versions
There are a lot more commands to be found on the Kubernetes web site.
helm
This is the package manager for Kubernetes, just like apt, yum or brew. Since the advent of Role Based Access Control (RBACs), there’s been a bit more complexity (creating a service account for Tiller) introduced into the setup, but this is worth the security peace of mind as you’ll recall without RBACs access to the cluster mean you, or the service or applications you install have administrator i.e. root access.
The commands we used:
- init – to install the Tiller service and configure the helm client
- repo – to update the local (to the cluster) copy of Charts repository. We also used the “stable” version of the Chart repository. The difference between “stable” and “incubator” versions of the Chart repository is quality assurance. There’s a considerable checklist to be achieved before a Chart is added to the “stable” repository.
- install – to install the WordPress Chart
- status – to view the status of the Chart installation and to also view setup instructions that appear after installing the chart.
- ls – to list any Charts we’ve installed on our cluster
- rm – to remove any installed Charts
Just like kubectl, there are a lot more commands you can use with Helm (including ones to create your own Charts).
Whilst there is a lot of set up involved around creating a Kubernetes cluster, it’s worth noting a lot of this was administrative: sign up to GCP, set up billing and create a project. Once you’ve done this, the process of connecting to your cluster, installing applications and accessing them is relatively quick.
What next?
We plan to work on a new series of blog posts around Kubernetes, going beyond this taster series.
Some of the topics we plan to cover:
- Using Kubernetes in Production – Infrastructure as Code, Securing web traffic, Persistent Storage, Service Mesh, Continuous Delivery pipelines and; Alerting and Monitoring. We’ve got all the buzzwords covered.
- Creating your own kubectl commands using Custom Resource Definitions
- Observability as practised in Kubernetes
- Providing platforms on Kubernetes like OpenFaaS
About the Author
Reliability Engineer at Smartwyre